Monday, November 24, 2008

Good Stuffing

My mom has always made the best Thanksgiving stuffing (or "dressing" if you'd rather) for as long as I can remember. But I have to say that as I've grown older and started making my own, I am thinking that mine could probably stand up to hers in a blind taste test.


Thanksgiving being just around the corner, I can't help but post my own recipe for stuffing that has been altered from my mom's original.

Good Stuffing
1 stick butter (reserve 2 Tbsp for sauteing, melt the rest)
1 loaf bread (any bread will do, even leftover hamburger/hot dog buns)
1 medium-sized yellow onion
2 ribs celery (include the green leaves too--that adds lots of flavor!)
mushrooms
ground sausage (optional)
1-2 Tbsp. poultry seasoning
salt and pepper
1 C. milk

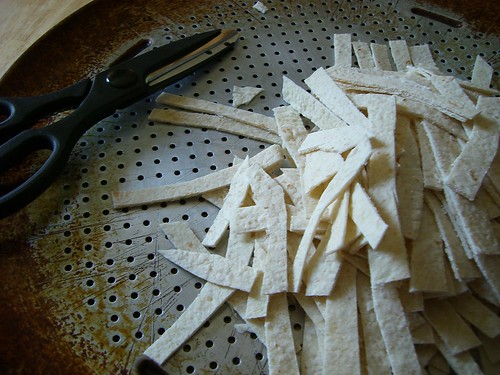
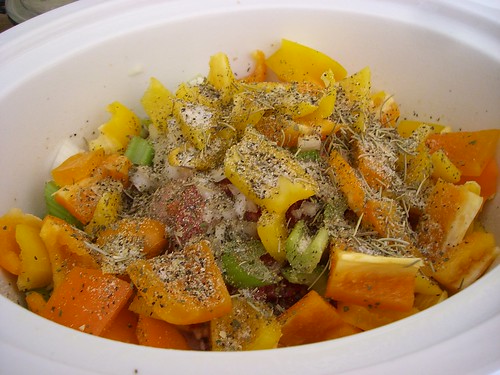
Night before:
Using a pair of scissors, cube up the bread onto a cookie sheet, making about 1-inch cubes. (No one will be measuring though, so just eyeball it. ;o)) Spread evenly and leave to dry overnight. If you don't have overnight, you can spread the cubed bread on a cookie sheet and bake for 20 minutes on low heat in the oven.

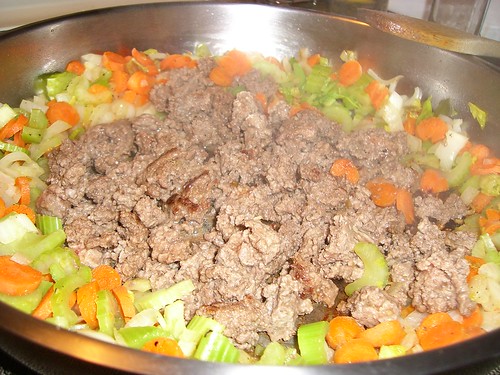
Cooking day: Chop onion and celery into smallish pieces. Slice mushrooms. Melt 2 Tbsp. of the butter in a skillet. Over medium-high heat, saute the chopped veggies with a pinch of salt until tender and soft, not too browned. (I like to add a little bit of poultry seasoning to the veggies for some added yumminess.) Remove veggies from pan, then add the sausage. Brown the meat, then add back the veggies and stir to combine. Set aside.

Start preheating your oven now to 350 degrees.

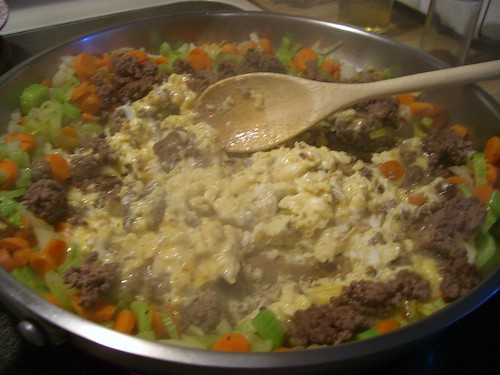
Spray a large casserole dish with non-stick spray. Add cubed bread. Shake poultry seasoning and pepper over the cubed bread. Pour the rest of the butter (melted) over the bread and give a light toss. Pour the veggie-meat mixture over the bread and lightly toss again.

Pour the milk evenly over the entire dish. (NOTE: You may need a little more depending on how dry your bread is. Just make sure there isn't a whole lot pooling at the bottom of the dish. A little pooling is fine.) Toss a little more.

TIP: You can toss all the prepared ingredients in a large mixing bowl to make it easier, then add it, completely tossed, into the casserole dish. But sometimes it's worth the extra effort to just be careful and toss in the casserole dish itself so you don't have to clean another bowl. ;o)

Cover the dish with foil and bake for 35 minutes at 350 degrees. Uncover, and bake for an additional 15-20 minutes or until the bread is golden brown and delicious and you can smell Thanksgiving in your house.

Friday, November 14, 2008

Ruth Lauer’s Brunch Casserole

In case you didn't catch it, my friend MamaMentor left a recipe on the comments of my breakfast casserole. Looks like a yummy one. Who doesn't like potato chips as a topping? YUM!

--------------------
MamaMentor says: Here's my favorite breakfast casserole. We have it on Christmas and Easter and other special occasions!

Ruth Lauer’s Brunch Casserole

Butter a 9x13 pan, then line it with trimmed slices of bread. Layer with ham or cooked sausage, then grated cheese, then more bread.

Mix in blender and pour over:

6 eggs
1 green pepper, chopped
½ tsp. salt
1 Tbsp. Worchestershire sauce
1 teaspoon mustard powder
3 cups milk
½ onion, chopped
Red and/or black pepper to taste

Refrigerate overnight. The next morning, preheat oven to 350˚. Meanwhile, melt 1 stick margarine and pour over casserole. Top with crushed potato chips. Bake 1 hour at 350˚. Makes 12 servings.

This casserole varies widely in character depending on your choice of meat, bread and cheese. Using good wholegrain bread makes it much heartier. You can use any kind of cheese, but we normally use sharp cheddar because we want it to taste cheesy!

Monday, November 10, 2008

Mrs. Brantley's Spice Tea Mix

My friend MamaMentor graciously emailed me this alternate recipe for Russian Tea that she uses. Her recipe and comments follow.

Mrs. Brantley's Spice Tea Mix

1 C. Tang
1 C. sugar
1 C. instant tea powder
1 tsp. cinnamon (or to taste)
1/2 tsp. ground cloves (or to taste)
1 small package lemonade mix (the kind that makes 2 quarts)

Mix together and keep in an airtight container. Add a couple of heaping spoonfuls to a cup of hot water and stir.

I often give this as a gift at Christmas time. Mrs. Brantley was my "dorm mother" in college.

Saturday, November 08, 2008

Breakfast Casserole

"Refrigerator Velcro" is a term I learned from Alton Brown of Food Network's Good Eats. It refers to any recipe that is versatile enough to use up just about any leftovers in the fridge. My favorite fridge velcro recipe is Breakfast Casserole.


It's excellent for brunch potlucks because it's a hot dish with protein, and it is really easy to throw together the night before for baking in the morning.

Breakfast Casserole

Whole package of ground sausage OR bacon
8-12 oz. of a green vegetable, chopped (broccoli is best; spinach
works, but do add extra salt because the flavor can be overpowering;
red and/or green bell peppers would be good too; asparagus works if chopped)
Onion, chopped
Bread (enough to line the bottom of a casserole dish; use ANY bread item you have--fresh or stale--sliced bread is good; bagels are awesome; hot dog buns are handy; and don't be afraid to mix different kinds)
Softened butter (not melted)
Cheddar Cheese, shredded
12 eggs
2 C. milk (whole is tastiest, but anything will do)
1 spoonful Mustard (prepared; Dijon is great if you have it, but doesn't matter)
Salt & Pepper to taste

In a largeish skillet, saute onions and brown the sausage. (If using bacon, drain and crumble when crisp, then saute onions.) Add veggies to the pan and cook/heat through.

Spray a 9x13 casserole dish with cooking spray. Lightly butter the bread, then line the bottom of the pan with buttered side up. Pour meat/veggies mixture evenly over the bread. Sprinkle cheddar cheese over the top.

Whisk eggs, milk, mustard, salt, and pepper together until blended. Pour egg mixture evenly into the pan. Refrigerate overnight (best) or bake immediately.

Preheat oven to 325 degrees. Bake for 60 minutes or until the eggs have set. Served best at room temperature (as opposed to piping hot).

Enjoy experimenting with this!

Thursday, November 06, 2008

5-minute Chocolate Cake, revised!

You may remember the 5-minute chocolate cake I posted back in September. My young friend Legossi wanted to try it for her family, but they have various food allergies, so she modified it and sent me the recipe.


So for those of you who might have gluten, dairy, or egg issues, you'll love this.

Gluten Free, Dairy Free, Egg Free Chocolate Mug Cake

3 Tbsp. Brown Rice flour
1 Tbsp. Tapioca flour
1/4 tsp. Xanthan gum
4 Tbsp. sugar
2 Tbsp. baking cocoa
1-1/2 tsp egg replacer
1 Tbsp. Water
3 Tbsp. rice milk
3 Tbsp. oil
3 Tbsp. chocolate chips (optional if you can find dairy free chocolate chips)
a small splash of vanilla extract
1 coffee mug

Add dry ingredients to mug, and mix well. Add egg, and mix thoroughly. Pour in the milk and oil. Mix well. Add chocolate chips (if desired) and vanilla extract. Mix well! Since the ingredients are gluten free, it may require more mixing than the other version of this cake because tapioca flour does not like to be mixed in!

Put in microwave and microwave 2 minutes and 30 seconds. Don't overcook or it'll become very, very chewy.

If you're not allergic to egg, then use a real egg instead of egg replacer because the egg replacer makes it a bit chewier than if it had a real egg in it.

The price of allergies.

Tuesday, November 04, 2008

Oatmeal, Banana, Peanut Butter, Chocolate Chip Cookies

Oatmeal, Banana, Peanut Butter, Chocolate Chip Cookies

A mouthful of a name for a cookie, isn't it? I suppose that's what you get when an amateur baker makes up her own cookie recipe. This is a modified/combined recipe from Betty Crocker's basic peanut butter cookies and a chocolate chip banana bar recipe from a unique cookie cookbook.

Oatmeal, Banana, Peanut Butter, Chocolate Chip Cookies

1/2 C. white sugar
1/2 C. packed brown sugar
1/2 C. shortening
1/2 C. peanut butter (chunky or creamy, whatever you like)
1 egg
3-4 very ripe bananas
Splash of milk
1/2 to 1 C. quick-cooking oatmeal (or 2-3 oatmeal packets, any flavor)
1-1/4 C. flour
3/4 tsp. baking soda
Pinch of salt

Combine sugars and egg til creamed (lighter in color and fluffy). Add remaining wet ingredients and mix well. Add dry ingredients. Mix well. Add chocolate chips at the end in whatever amount is demanded by those eating the cookies.

Oatmeal, Banana, Peanut Butter, Chocolate Chip Cookies, in progress

Scoop onto a lightly-sprayed baking sheet (or on parchment paper). Press down ever so slightly. They will only spread a little bit. Bake at 375 for 8-12 minutes, depending on your oven. Place on a cooling rack until cool enough to handle so you can eat them faster. Store in an airtight container.

These are great for lunches because they are so wholesome with the bananas and oatmeal. You could add raisins or nuts too if you (or your little students) like them.

COOKIE TIP: Cookies will continue to cook for a short time after leaving the oven, so pull them from the oven just before they look done. If they look done in the oven, they'll likely be overdone by time you get them off the baking sheet.

Sunday, November 02, 2008

Russian Tea


A few Christmases ago, my sister-in-law Kate, maker of those amazing Toasted Raviolis, gave jars of Russian Tea as a part of her goody-laden Christmas baskets.

I had never heard of Russian Tea (though apparently I was in the minority with the rest of the world), but once I tried it, I was hooked. It is particularly great for sore throats or uneasy tummies. This recipe makes a good-sized batch, so it will last for many cups of orange-spicey goodness. This is a modified version from various recipes I found on the internet.

Russian Tea

2 C. instant tea (green tea with lemon flavoring is great)
2 C. Tang
1 C. white sugar
1-2 Tbsp. cinnamon
1-2 Tbsp. cloves
Lemondrops (roughly smashed in a plastic bag with a heavy glass)

You will likely need to buy two containers of Tang, unless you can find really big ones. But two cups of a drink mix is a lot. Mix all ingredients thoroughly with a fork in a large bowl.

To serve, heat a mug of water for 2 minutes in the microwave or start with hot water. Add 2-3 Tbsp. Russian Tea mix and stir til dissolved.

If you know why this standard holiday beverage is called Russian Tea, please comment and let us know! Of course, I may be embarrassed to find out that it simply resembles a traditional Russian tea. :oP

Friday, October 31, 2008

Aunt Karen's Fruit Salad


Many years ago, my aunt Karen visited and shared with us her famous fruit salad recipe. I loved it so much that I asked her to write it down for me. My mom laminated it, and I have had it in my arsenal ever since. This recipe makes a LOT of fruit salad, so it's great for potlucks or big groups and families.

Aunt Karen's Fruit Salad

1 pkg. vanilla pudding (cook & serve kind)
1 pkg. tapioca pudding (cook $ serve kind)
1 lg. can peaches
1 lg. can mandarin oranges
1 lg. can pineapple tidbits
3 barely under-ripe bananas

Drain juice from the cans into a bowl or large measuring cup. Add enough water to make 3 cups. Whisk in both pudding mixes and microwave on high for 3 minutes. Stir, then microwave for another 3 minutes. Allow to cool completely.

Cut up any canned fruit halves or slices into bite-sized pieces. Mix the cooled pudding with the canned fruit. Add sliced bananas and toss gently. Serve chilled.

You could add maraschino cherries, and the temptation is great let me tell you, but it will turn the pudding a strange reddish pink color that resembles the gel in "salmon egg" fish bait, so I don't recommend it. ;o)

Wednesday, October 29, 2008

Stuffed French Toast

Stuffed French Toast

Sometimes we just have to spoil ourselves for dinner. Yes, dinner. We're a breakfast-at-dinner family for sure. My daughter likes Malt-O-Meal for lunch on the weekends. LOL This is a recipe I modified from a breakfast cookbook.

Stuffed French Toast

Filling:
8 oz. brick cream cheese
1/4 C. packed brown sugar
1/4 C. maple syrup (or white sugar)
1 Tbsp. vanilla
Orange Zest (optional)
Cinnamon
Pinch of salt

Combine these ingredients, then stir in (if desired) chopped, roasted nuts (any kind you like) or shredded, toasted coconut.

Stuffed French Toast Filling

The Bread:
Use regular, sliced bread. Butter one side of each. Make a sandwich, buttered side out, by spreading the filling mixture between two slices of bread.

If you're feeling ambitious, slice a whole loaf at about 1" thick to make 8 slices, then create a pocket in them for the filling. Butter both sides and stuff with equal measures of filling.

Dipping Mixture:
1 C. whole milk or half & half
3 large eggs
1/4 C. flour
3 Tbsp. white sugar
2 tsp. baking powder
1 Tbsp. vanilla
pinch of salt

Milk & Egg Mixture

Soak each sandwich (or stuffed slice) in the egg mixture, turning to coat both sides until saturated, but not falling apart.

In a skillet, melt a pat of butter with a splash of vegetable oil. At medium-low heat, cook as many slices as you can fit without crowding each other, until golden brown on both sides. (Be careful when flipping the sandwiches; they can slide apart pretty quickly.)

Transfer the French toast to a baking sheet, and bake in a 400 degree oven til puffy and crisp on the outside. (About 6-10 minutes.) Serve fresh from the oven with maple syrup or your sugary breakfast topping of choice.

Monday, October 27, 2008

Product Review: Dishers

I admit, I am a closet kitchen gadget lover. It's a trait I inherited from my mom, who loves to have all the new and cutest kitchen gear available. However, I've been blessed (and yes I say blessed) with small kitchens and limited drawer/counter space since I've had my own space to clutter up.

So I've had to curb my desires for fun stuff and go for functional instead. "Everything must serve many purposes" is my mantra, adopted from Alton Brown of Food Network's Good Eats.


Looking at dishers, those shiny kitchen devices that resemble ice cream scoopers, they appear to take up a lot of drawer space for perhaps only one purpose. However, I have to say that once I gave in and tried it, I would highly recommend getting one small to medium size disher for your own kitchen.

They're great for scooping cookies of equal sizes, forming meatballs, even measuring pancake or muffin batter. I have a smallish one that is perfect for mini-muffins, and if I need to make bigger muffins, I just use two scoops instead of one.

Yes, it takes up room in the drawer, but it's handy for so many things. If you have a disher, what size is it, and how do you like to use yours?

Saturday, October 25, 2008

The Versatile Pancake


My kids love a hot breakfast, and I love being able to make it for them on the fly. We used to spend $8-10 on frozen waffles every two weeks, but I soon realized that a $3 box of baking mix will make enough pancakes to last almost an entire month.

So I make a huge batch, adding to the dry mix such goodies as cinnamon, cloves, nutmeg, brown sugar, pancake syrup, jam, etc. (Not all at once, mind you!)

No need to measure the water or milk either. Just add enough so the consistency is wetter than you probably think it should be. You want it to be able to pour easily, not plop it. (Rather like good, wet mud.) If you add too much water, just add in a little more baking mix. Use a small ladle to make measuring easy.


Keep the heat at medium since you're going to be cooking for awhile. Remove the pan from the heat and spray with non-stick cooking spray between pan-fulls.

I flip dozens of flapjacks in one session, cooling them on racks. The cooled pancakes can be layered with paper towels in a plastic bag and frozen.


(No, that isn't mold, for this batch, I shook sprinkles on the cakes after ladling them into the pan. They melted when I flipped them. But hey, they still taste the same!)

Lay the bags flat in the freezer at first, but once they reach Frisbee rigidity, they can be stacked like cards (or Frisbees for that matter) or however you'd like so you can reserve space in your freezer.

To warm them up, wrap loosely in a paper towel and microwave for 30-45 seconds or, better yet, to keep them crispy on the outside, place them in a toaster oven at just above medium high heat and press the button for toast.

Impromptu Caramel Apple Topping
Bite-sized apple chunks, peeled
Caramel sauce
Butter

Melt a pat of butter in a pan. Add apples and cook til tender. Add enough caramel sauce to coat the apples and then some. Serve over pancakes or waffles or...ice cream!

PERSONAL NOTE: My kids love the fruit cups from Chick-fil-A, but they aren't crazy about the apple chunks. I save these and use them the next day for pancake topping. A couple extra containers of caramel sauce from McDonald's apple dippers work great for this recipe. (I know, we probably eat out WAY too much!)

A Review: Worcestershire Sauce


I was once told by a timid cook that she was afraid of Worcestershire sauce. There's nothing to be afraid of here! (Except perhaps spelling it correctly.) This dark lovely condiment is a fermented combination of a dozen or so ingredients which may include vinegar, molasses, high fructose corn syrup, anchovies, water, onions, salt, garlic, custard, tamarind concentrate, cloves, and natural flavorings.

Worcestershire sauce is greatly versatile and can be used in both cooked and uncooked food. It can serve as a part of a marinade or as a steak sauce. It can be integrated into meatloaf and burgers or added to Chex mix to give it that extra special enhancement.

Sometimes I like to add it to things just to see what happens.

Yes, that picture above is of a whopping 18-ounce bottle of Worcestershire sauce. How long does it take for a family of two adults and two small children to get through 18 ounces of Worcestershire sauce? A LONG stinkin' time. But we did it! :oD

Thursday, October 23, 2008

Fried Rice

Fried rice is one of the few Asian foods my husband will eat. Coming from a Thai culinary heritage, this is tough for me. But at least he's willing to pick SOMEthing he likes from Asian cuisine. Of course, there is no other fried rice that will do except my own. He can't stand fried rice from a restaurant. So here's my version, changed and adapted over the years from my mom's original recipe:


Fried Rice

Meat (ground beef, chicken, pork, kangaroo, whatever you like)
Onion, Carrots, Celery (diced)
Frozen peas
Garlic
Eggs
Cooked rice
Soy sauce
Tomatoes (diced)

In a large skillet or wok, cook veggies (except peas and tomatoes) in a bit of oil for a few minutes til almost softened, but still firm. Push veggies to the sides of the skillet, then brown meat in the center. (Look at you, you're stir frying!)


In a separate bowl, whisk eggs and a couple splashes of soy sauce together until smooth. The number of eggs you use greatly depends on how much egg you like in your fried rice and how much you're making. For example, my mom's original recipe calls for two of the white ovoids. With the way my husband likes his fried rice, I am now up to using seven eggs for one batch.

Push the meat and veggies up to the sides of the skillet. Pour in the egg mixture in the center and stir constantly until it begins to firm and form like scrambled eggs. It's fine at this point if some of the meat and veggies from the edges decide they're destined for an omelet. Just try to keep the eggs in the center of the pan.


Once the eggs are almost set (they will finish cooking as you finish stirring), go ahead and mix it all together, then add the rice by cupfuls until you have an even ratio of rice to vegetables/meat. Add peas.

Pour on the soy sauce and keep stirring it up. Taste as you go until you get it to the saltiness you prefer. Toss in diced tomatoes at the very end.

Fried rice goes with many different things, as well as stands up just fine on it's own thank-you-very-much, served along with some cool, sliced cucumbers. YUM.

Tuesday, October 21, 2008

Product Review: Floured Baking Spray

Can I just make an editorial comment here? The No-Stick Cooking Spray with Flour is a product made by Crisco.

I was enamored by the amazing commercial footage which touted how easy it would make baking for me and how efficient and quick preparing pans would soon become. Have you ever seen those commercials?

Well, I'm here to tell you that it DOES work. It IS faster than greasing and flouring a pan the old fashioned way. However, it's not nearly as glamorous as the commercials made it out to be. For one thing...
  1. The spray does not stay a floury white after spraying onto the pan. It turns clear like any other spray.
  2. The product DOES coat fairly evenly, but a few applications may be necessary for the corners.
  3. And the nozzle collects this horrid yellow goo at the top after just a couple consecutive sprays. Gah!
Needless to say, this is a two-sided review of Crisco's No-Stick Cooking Spray with Flour. While it's an effective product for those bakers out there who are in a hurry, if you get grossed out easily, then perhaps you ought to stick to tradition and get out the paper towel and shortening.

Sunday, October 19, 2008

Easiest Chicken Cattiatore Ever

Cattiatore means "cooked in a casserole." I've mostly baked my chicken cattiatore, however this is one I cooked in the slow cooker. It worked great and was a lot less work than fussing over the oven.


The Easiest Chicken Cattiatore Ever

4-5 chicken breasts
1 can diced Italian-style tomatoes (tomato soup will do in a pinch, but it won't be the same)
1 can cream of chicken (or mushroom or celery, whatever you have on hand)
mushrooms
tomatoes (yes, more!)
onions
bell peppers
rosemary, basil, garlic salt & pepper, parsley
splash o' milk

Place chicken in a single layer in a large casserole dish (or slow cooker) coated with non-stick spray. Combine remaining ingredients. Pour over chicken. NOTE: If you're doing this in the slow cooker, feel free to just throw it all in without mixing. It will meld together as it heats.


Bake, uncovered, at 375 for 45 minutes if the chicken was thawed. If it was frozen (like my chicken usually is), bake for 80-90 minutes. If you're going the slow cooker way, give it at least 5-6 hours if the chicken is frozen, perhaps 3-4 if it isn't.

Serve over rice. The vegetation-liquid part of this dish is uber delicious after soaking into the rice on your plate. Mmm... Also great with Cheesy Garlic Bread.

Friday, October 17, 2008

Cheesy Garlic Bread

I have to admit that the frozen garlic bread you can get at the store is absolutely mouth-watering. But as with most things, sometimes it's tastier (and cheaper) to make your own. Good garlic bread doesn't take a whole lot really. I bet you have what you need right this very second.


Cheesy Garlic Bread

Sliced bread or rolls (club rolls shown)
Butter or margarine
Shredded mozzerella or another good, melty cheese
Garlic salt

Split rolls in half lengthwise if necessary. (You can even use sliced sandwich bread if that's all you've got, but I would suggest using the toaster oven to avoid any nasty bread burns.) Spread one side with butter, then shake on some garlic salt.

SIDE TIP: Make your own garlic salt by combining a 2-to-3 ratio of table salt and garlic powder.

Place bread on a baking sheet and sprinkle with cheese. Bake at 400 degrees for 8-12 minutes, depending on the thickness of your bread. You're going for a nice brown on the cheese.

This side dish goes great with any Italian meals, especially tomato-based ones that require the sopping of plates with bread.

Coming up next is a recipe that would be perfect for Cheesy Garlic Bread: Chicken Cattiatore

Wednesday, October 15, 2008

Daring Sandwich I

I know I've mentioned the infamous peanut butter and mayo sandwich, which I must one day share, but today, I unveil one of my secret loves--tuna. Within the last few years, I discovered Albacore tuna which knocks conventional canned tuna out of the water. (A good tuna steak is not what you would think either. It actually doesn't taste at all like a giant slab of canned tuna. But I digress.)


Since discovering this whiter, tastier variety of tuna, I've taken to having my favorite version of tuna salad sandwich. If you usually put potato chips in your sandwiches and like the taste of all the ingredients below, then don't knock this weird combination until you've tried it.

Daring Sandwich I, Tuna Edition

1 can Albacore tuna (water drained onto a plate for the cats)
Real mayonnaise
Garlic salt & garlic pepper
1 stalk celery (finely diced)
Chow mein noodles
2 or 4 slices of bread

Toss the tuna, mayo, S&P, and celery in a bowl. Gently mix until evenly combined. Add S&P as needed to taste. Spread the tuna salad onto bread, then top with a goodish sprinkling of chow mein noodles. Enjoy!

One of the keys to great tuna salad is refrigerating the can of tuna ahead of time. Warm canned tuna is just... *shudders* Let's just not go there.

Monday, October 13, 2008

Food 911: Tip #1

Sara from Sara's Sojourns commented earlier this month:

The place I'm staying doesn't have pickle relish (I know, that's sorta un-American!) and my fish was already in the oven and I wanted tartar sauce to go with it.

So I searched the fridge and came up with sweet baby gherkins (pickles for the uninformed) and then I found a cheese grater. I put a few of those pickles over the small side of the grater. Worked like a charm!


Great tip, Sara! Thanks muchly!

If you have a cooking, baking, substitution, or otherwise food-related tip, please email it to myfooblog (at) gmail (dot) com. Be sure to include a link to your own blog if you would like me to add it to your post. Thanks!

Saturday, October 11, 2008

Quick Tortilla Soup


I love recipes that can be made from food in the pantry, and this is based on one of those. My brother has a recipe for Tortilla Soup that's made entirely from canned items, but this one has a few fresh ingredients added.

Quick Tortilla Soup

Diced veggies (Onions, Celery, Bell Peppers)
Green Chilies to taste (canned are fine)
1 can corn n' peppers
1 can diced tomatoes (with green chilies)
1 can black beans
+ any additional veggies you like for tortilla soup (e.g. zucchini, yellow squash, more corn, etc.)
1 box chicken or beef broth
diced steak or chicken (cooked)
water
Garlic Salt & Garlic Pepper (regular S&P will do fine too)
Cumin
Shredded cheese
Tortilla chips

Sauté diced fresh veggies in the bottom of a large pot or dutch oven. Once softened, add canned veggies (including any liquid), broth, and meat. Add enough water to come up 1-2 inches above the ingredients. Add salt, pepper, and cumin to taste. Simmer for 10-15 minutes.

Serve hot with crumbled tortilla chips or strips (see previous post) and cheese. We like to put the tortilla chips with some cheese on the bottom, spoon soup over the mound, then top with more chips and cheese.

NOTE: The type of cheese is up to you. Any cheeses with gooey potential will be fabulous--cheddar, Monterrey Jack, "Mexican" blends, even mozzarella.

Thursday, October 09, 2008

Baked Tortilla Strips (or chips)


Store-bought tortilla chips are absurdly expensive for what they are (i.e. flour, water, salt). So I like to make my own whenever the opportunity arises. That is, whenever I have tortillas that are about to go stale.

I bake them so there's no frying (or extra fat) involved. It produces a denser (and I think tastier) chip that stands up to dips really well. Not to mention you can buy fresh tortillas for pennies each, making these chips much more affordable.

Baked Tortilla Strips

Cut corn or flour tortillas into strips or triangles (or whatever shape suits your fancy) onto a dry baking sheet. A pizza pan with holes in it works excellently.


Spray with cooking spray. You could sprinkle a little salt on them if you wish at this point. Toss gently to coat, then spread them out evenly.

Bake at 325 degrees until crisp and light brown. I usually put the pan in as I'm preheating, then 15 minutes after turning the oven on, I turn it off. Leave them in til the oven cools or until you get a chance to remove them later. (Or the next time you open your oven to bake cookies. *oops*)

These strips are fabulous for Tortilla Soup, the recipe for which will be posted next!

Tuesday, October 07, 2008

Roasting Veggies


There's a very simple way enhance the flavor of just about any vegetable that might otherwise be given a lack luster steam bath, only to be later ignored or shoved off behind that mound of unchewable steak fat. That, my friend, is roasting.

Roasting causes caramelization which means that sugar is brought out of the food and burned on the surface. Ooo, yum, right? But didn't you catch that? SUGAR! So the simple math equation goes like this:

roasting (caramelization) + veggies = sweetened veggies

I've tried this method with many different veggies, and so far everything has been a success. Hey, if roasting can make brussel sprouts taste good, then we must be on to something!

Roasting Method

Slice, dice, or whatever you'd like to do to put the veggies into edible shapes. Place them on a baking sheet lined with foil. Spray somewhat liberally with cooking spray, then sprinkle generously with Kosher salt and fresh cracked pepper. Toss to coat.

Spread the veggies out evenly on the pan and roast in the oven at 400-425 degrees until the edges begin to turn dark brown. (Usually 10-15 minutes.)

Vegetables that were once loathed (for various reasons, not always taste), but now loved in our house due to the roasting method: corn on the cob, asparagus, whole green beans, zucchini and other squashes. We also like roasting red potatoes, bell peppers, mushrooms, and purple onion wedges.

Sunday, October 05, 2008

Sherbet Float


Sherbet Float

Your choice of sherbet flavors
Lemon Lime Soda

It seems pretty easy, and it is! Simply scoop some sherbet into a glass, then top it off with the soda. This is a fruity version of a root beer float that is not only delicious, but also very pretty to boot.

Sherbet vs. Sorbet
The difference between sorbet and sherbet is easier to keep clear straight than their namesakes. A sherbet is made with milk or another fat, making it much more like ice cream than a sorbet.

A sorbet is technically Italian ice and is somewhat grainy in texture. If you've ever had a granita, then you've had a true sorbet.

You CAN use a sorbet in this recipe--hey, I'm all about the experimentation!--but I like the sherbet because of its creaminess.

Friday, October 03, 2008

Baking Tip #1: Unused Muffin Cups


If you're not using all the cups in a muffin tin, put an ice cube in each unused cup to even out the heating and protect your pan from burning.

p.s. Those silicone baking dishes are bunk. They don't get hot enough to give anything a good enough browning, and they're a pain to stand up in the dishwasher.

EDIT: (10/4/08) Linda B gave an excellent suggestion for silicone muffin pans in the comments of this post: "The silicone muffin cups are great for poaching eggs en masse, though. That's what I use them for. Just a little spoon of water in each one, then break an egg into each one, season, and cover with foil. Bake at 350 for 10-20 minutes (depending on how firm you want them) and voila! A dozen poached eggs!"

Wednesday, October 01, 2008

Smoothies in Less Than a Minute

I have a strange fascination with infomercials. I love to watch them, but 98% of the time, it's my interest in marketing ploys, er, techniques that has me fixated to the screen at 2:00 a.m. Admittedly, most of the stuff sold on TV is extra junk and clutter.


The Magic Bullet, however, is one of those things which actually looked like a good idea. It doesn't take up a lot of space, and it makes single servings. Strangely enough, a couple weeks after I saw their infomercial for the first time and completely unsolicited, my mom gave me a Magic Bullet. It's been sitting on our counter, getting used at least a few times a month, sometimes a few times a week, and mainly for breakfast smoothies.

Quick Fruit Smoothie

Fruit
Yogurt
Orange Juice (or milk)

Start with any fruit you have on hand (canned, frozen, fresh), and don't be afraid to mix fruits. If you have some leftover peaches, go ahead and throw them in with the pears. Who knows? It might actually be yummy. (Or you won't even taste the difference.) Any stone fruit (fruit that has a seed), berries, or other soft stuff like bananas, are going to be great for smoothies.


Add some yogurt and juice or milk. Use as much as you like. A whole Yoplait container is usually perfect, but do whatever strikes your fancy that morning.

Try different kinds of yogurt too. The combinations really are endless. I usually have a standby of vanilla yogurt on hand, but don't shy away from throwing in that blueberry yogurt with a banana and some pineapple. Maybe try the key lime yogurt with some mandarin oranges. Ooo... That sounds pretty good actually.

The amount of juice or milk you add depends on how thick you'd like your smoothie to be. More liquid for a more drinkable smoothie; less for a spoonable one.


Blend your ingredients in a blender until smooth.


Of course you don't HAVE to have a Magic Bullet to make smoothies. You could make it in your food processor if that's all you have. The Bullet just makes it a whole lot easier and requires less cleanup.

Experimentation Tip:
I've heard of people adding instant coffee to their smoothies for a little extra kick. I haven't tried it before because I'm not sure how I feel about mingling fruit with the sacred beverage. Also, my opinion of instant coffee is not very high. At all.

If you've tried this before, do comment! I would be interested to hear if it makes a difference in taste or potency.

Tuesday, September 30, 2008

How to Cut a Mango

A mango is a popular tropical fruit that can be found in most grocery stories. Though fresh mango is incredibly tasty, it is one of the most perplexing fruits to cut. It has a large, almond shaped seed on the inside which holds onto the mango flesh like it never wants to let go. There are plenty of tips and tricks out there on wrangling this fibrous fruit, but here's the one that always seems to work for me.

1. Start with a good, ripe mango. That is, it should yield to pressure just a hair over "slightly."


2. Slice off the mango's "cheeks." Think of your mango in terms of having three parts: two sides and one seed. The cheeks are the meaty sides of a fruit. You can tell by the shape of the body which direction the seed lies inside.

Use a sharp knife and cut as close to the seed as you can on either side. You will then have three parts.


3. Score the flesh into cubes, but only cut to just inside the skin; then invert to make the cubes pop out for easy removal.


The real key here is to make sure your mango is ripe. You may need to experiment over time to get a good sense of when a mango is at its peak. If it doesn't yield to gentle pressure, it's not ready.

How do YOU slice your mangoes? Comment and share!

Coming up: A short infomercial, and Make a Fruit Smoothie in less than a minute!

Sunday, September 28, 2008

In-A-Pinch Breadcrumbs


Breadcrumbs are one of those things that are great to have on hand in the pantry because they don't really go bad very quickly. But sometimes you just don't have them or you need a little more than what you've got left in the bag.

Never fear! Breadcrumbs are easy to substitute and a lot of fun to experiment with. Here are some options for you:

1. Use stuffing mix. Yes, I'm talking Stove Top or even your average generic brand of stuffing mix. I actually prefer using these to "regular" breadcrumbs because they're already seasoned. Just pop the dry mix into the food processor* and whirl away until you have what you need.

2. Make them homemade! Yes, you can make homemade breadcrumbs in no time whatsoever. Take several slices of whatever sandwich bread you have on hand and process into crumbs. Toast them on a cookie sheet in the oven at 400 degrees or in a dry pan on the stove.

I've never tried toasting the bread first and THEN processing it, and I bet it would work, but I'm guessing it would take longer. My toaster oven can only handle three slices of bread at a maximum. But of course, if you had leftover toast for some reason or other leftover bread, those would work perfectly.

3. Mix and match your dry pantry goods. Crackers are a staple that should always be kept in your pantry for all your cooking, baking, and snacking needs. Dump a sleeve of them into the food processor and add some extra flavor with potato chips, sliced almonds (the flavored ones for salads are great for this), sunflower seeds, or whatever you have that's dry and sounds like a good flavor match for what you're using the breadcrumbs for.


I used Townhouse crackers and ranch-flavored sliced almonds for the breadcrumbs in Kate's Toasted Ravioli.

* No food processor? No problem! Get yourself a large baggie and crack away at it with a rolling pin, a rock, your fist, or I suppose you could use a sturdy coffee mug.

Friday, September 26, 2008

KW's Creamy Coffee Cake


The reason why this is called a "creamy" coffee cake is because it is so moist, you won't even believe it. It hails from my dear friend KW in California. She shared it with me last summer during a time when I was charged with feeding 30+ hungry teenagers for 10 days.

KW's Creamy Coffee Cake

1/2 C. oil
1 pkg. instant vanilla pudding (larger box if you can find it)
4 eggs
1 box yellow cake mix (or white or whatever you like)
2 tsp. vanilla
8 oz. sour cream (roughly)

Blend and mix for 2 minutes in mixer on medium speed. Grease your cake pan. You can use an angel food pan like KW does or I've found that a bundt pan works great too.

Pour 1/2 mixture into cake pan. Go easy on this half because it always seems like you need more, when really, the second half is going to come up short. Now make the topping.

1/2 C. ground pecans (or coarsely chopped; toasted if you can)
3/4 C. brown + granulated sugar (mixed)
cinnamon (I never measure cinnamon; it's way too good to measure)

Sprinkle 1/2 of the topping over the batter in the pan, then swirl with knife. Pour in remaining batter, then drop in the rest of the topping. Bake 1 hour at 350 degrees.

KW has made this recipe as muffins. It made 24; she baked them at 350 degrees for about 20 minutes. I fully intend to give that a try one of these days.

Wednesday, September 24, 2008

Kate's Toasted Ravioli


My sister-in-law, Kate, is not only the loveliest woman ever to grace my brother's romantic path, but she is also a very fine cook. A few years ago, she shared this recipe with me, and it quickly became one of our family's staple meals.

Kate's Toasted Ravioli

Frozen Ravioli (whatever kind you like)
Breadcrumbs
Grated Parmesan
Milk

Preheat oven to 400 degrees. Fill a shallow dish with breadcrumbs and mix in a generous sprinkling of Parmesan. Fill another dish with milk. Dip raviolis one at a time in the milk, then breadcrumbs, pressing down on them to coat with crumbs. No need to thaw the raviolis first. They're much easier to handle when they're still frozen.

TIP: Use one hand to grab the ravioli from the bag, dip, and drop into the milk. Then use the other hand to scoop, cover, and press breadcrumbs. This will eliminate the infamous "club fingers" that will inevitably come with messy wet breading procedures.


Place the coated ravioli onto a lightly sprayed baking sheet and bake at 400 degrees. Bake time varies depending on the size of your ravioli. It may only take 15 minutes, but it might take up to 25.

Start with 10 minutes, then check them. You're looking for a nice golden brown color. You'll need to flip halfway through the cooking time, so be sure to keep an eye on them. (They don't burn super easy though, so don't get TOO stressed out about it.) As Kate told me, "You'll know they're ready when they start oozing filling."

Serve with marinara or spaghetti sauce, whatever you like to do. I served mine last night with a mushroom spaghetti sauce with ground beef and onions added.

Monday, September 22, 2008

The Plymouth Fury II


This is a knock-off from a little delicatessen called Firebrand in eastern Colorado. They call it the Plymouth Fury because it has turkey and cranberry sauce in it. (You know, Thanksgiving, pilgrims, Plymouth Rock, etc.) My Junior year of college, I probably ate one of these at least twice a week. Their soup at the Firebrand is to DIE for.

I've knocked-off the Plymouth Fury many times over the years in various incarnations. This is the latest one and the first I have documented.

The Plymouth Fury II

Bread (original uses sourdough)
Sliced deli turkey
Cream Cheese
Cranberry sauce (whole or jellied)
Lettuce (original uses alfalfa sprouts)

Spread your bread or roll or bagel with a generous offering of cream cheese. Both sides please. Arrange the turkey, then top with cranberry sauce and lettuce. (I have to say that the alfalfa sprouts are quite tasty. But I don't usually buy that sort of thing.)

Saturday, September 20, 2008

5-Minute Chocolate Mug Cake

We have our first new Foo Fan recipe submission! Thank you to Michelle for passing along this little dandy of a treat. I couldn't resist trying it. Who doesn't have five minutes to invest for some chocolate cake love? Nom nom nom...


5-Minute Chocolate Mug Cake

4 Tbsp. flour
4 Tbsp. sugar
2 Tbsp. baking cocoa
1 egg
3 Tbsp. milk
3 Tbsp. oil
3 Tbsp. chocolate chips(optional)
a small splash of vanilla extract
1 coffee mug

Add dry ingredients to mug, and mix well. Add egg, and mix thoroughly. Pour in the milk and oil. Mix well. Add chocolate chips (if desired) and vanilla extract. Mix well! [Is your fork getting tired yet?]

Put your mug in the microwave and cook for 3 minutes at 1000 watts. [Here's a site that will convert wattage for your oven.] The cake will rise over the top of the mug, but don't be alarmed!


Allow to cool a little (the mug WILL be hot), and tip out onto a plate if you like. Then EAT!

Michelle says, "This can serve two if you want to feel slightly more virtuous."

Suggested Experimentations:
* Add more than the necessary chocolate chips
* Swirl in couple Tbsp. raspberry preserves
* Add coconut
* Swirl in chocolate syrup (like for milk)
* Add nuts

For any of these additions, you could simply sprinkle/pour them on top, and they will sink in as the cake bakes.

The Taste Test: This is most definitely a good one if you're in serious need of chocolate fix. I would highly recommend not skimping out on the chocolate chips--in fact, be generous! I'm going to try putting in some raspberry preserves someday in the future. It was a lot of fun to make. Thanks, Michelle!