Tuesday, October 06, 2009

Candy Corn Cookies

Don't know what to do with all that leftover candy corn from Halloween? Or maybe you're a candy corn fanatic who wants to experience candy corn on a whole new level? Either way, these cookies are sweet and chewy and positively addicting.


Candy Corn Cookies
Start with a basic chocolate chip cookie recipe (minus the chocolate chips):

1/2 C. granulated sugar
1/2 C. brown sugar
1/3 C. butter, softened
1/3 C. shortening
1 egg
1 tsp. vanilla
1-1/2 C. flour
1/2 tsp. baking soda
1/2 tsp. salt


Mix sugars, butter, shortening, egg, and vanilla until fluffy. Stir in remaining ingredients.

Fold in 1 C. chopped candy corn. (Roughly snapped/cut into thirds.)

Line baking sheet with parchment paper. Yes, parchment paper. Not wax paper, not baking spray. It has to be parchment. Nothing sticks to that stuff, so if you don't want to ruin your cookie sheets, shell out for the parchment.

Scoop dough into balls onto the paper, leaving plenty of room between in case any cookies bleed sugar. (And a lot of them probably will.)

Bake at 375 for 8-12 minutes. (Check every two minutes after 8 have gone by.) Pull them just as they begin to brown and allow to cool on the parchment paper for several minutes.

Be careful not to touch them right away because melted sugar is like napalm.

Use a spatula or other flat utensil to lift (and/or break apart if necessary) cookies. Cool completely on a wire rack. Store in an airtight container.


The ones in my pictures are pretty big, but whenever I make these again, I'll probably do them at half the size. That would make it a scant tablespoon's worth of dough for each cookie. A nice touch would be to put one whole candy corn on top of each cookie.

Monday, July 13, 2009

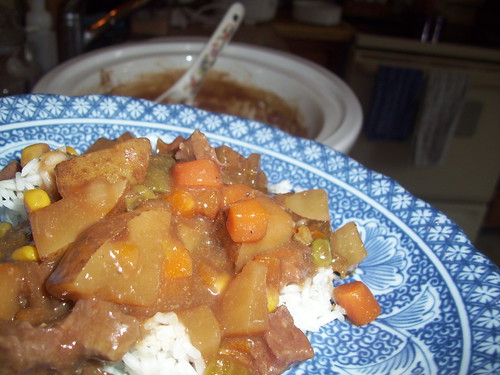
Beef Veggie Stew [AFM]

We received a package of four "ribeye steaks" from Angel Food Ministries with our June order. I finally got two of them defrosted and tried to pan-sear them for a beef salad. Unfortunately, I found them very...flimsy. They also seemed a little watery and had a ring of tough tissue around the edges. (Is that a bit too much information?)

I realized that these things couldn't be used in the traditional way I would cook steak. Not wanting to make them go to waste, I decided to go the soup route--or rather the stew route.


Beef Veggie Stew
4 x 6 oz. Ribeye Steaks (cubed)
4 potatoes (medium-sized; cubed with fat trimmed)
diced veggies (celery, carrots, onions)
frozen, mixed veggies
brown gravy mix (dry)
cracked pepper
water


Place diced potatoes in the bottom of a crock pot. Sprinkle with gravy mix. Add veggies. Sprinkle more gravy mix. Add cubed meat. Sprinkle with pepper and gravy mix. (Yes, I have a brown gravy mix shaker.)

Fill pot with water to nearly the top of the pile of ingredients.

Cook on high for 4-5 hours, stirring every couple hours if you can. Serve over rice if you want a carb overload, or just serve with crackers.

By the way, a bag of rice also came with our Angel Food order. Yay!

Angel Food Ministries

I apologize profusely for the lack of recipe posts lately on myfooblog. We've been going through some, shall we say, economic changes, and we have had to readjust the way we have been grocery shopping and cooking. As I've adjusted to this (and several other changes), blogging has not been on the top of my list.

But life is stabilizing, and I'm ready to start sharing some of my kitchen escapades with you once again.

First, let me introduce you to our new grocery friend: Angel Food Ministries. AFM is a non-profit, non-denominational organization dedicated to providing grocery relief and financial support to communities throughout the United States.

Here's the spiel: Angel Food is available in a quantity that can fit into a medium-sized box at $30 per unit. Each month's menu is different than the previous month and consists of both fresh and frozen items with an average retail value of approximately $60. Comparison shopping has been done across the country in various communities using a wide range of retail grocery stores and has resulted in the same food items costing from between $42 and $78.

Generally, one unit of food assists in feeding a family of four for about one week or a single senior citizen for almost a month. The food is all the same high quality one could purchase at a grocery store. There are no second-hand items, no damaged or out-dated goods, no dented cans without labels, no day-old breads and no produce that is almost too ripe.


We've been ordering from Angel Food through our church for the last two months, and honestly, I couldn't be happier with our savings. We used to spend $160 every two weeks on groceries, now we're putting in about $130 per MONTH. (We order 2 "signature" boxes plus 1 Fruit & Veggies box each month, then go to the store for extra things like bread, yogurt, and more fruit and milk.)

Yes, there are some foods that come in the AFM box that are things we wouldn't normally purchase. For example, we have more frozen french fries than we know what to do with. But I can get creative with these items--like using the french fries for making potato soup.

Getting our groceries from Angel Food has really stretched me creatively in the kitchen, and I love it!

I used to fanatically watch a show called Doorknock Dinners which featured Gordon Elliot taking a guest chef into the home of a usually busy person and cooking them a dinner by using only the items they had in their home.

One of my most fun cooking challenges is figuring out how to make something delicious out of what we have on hand. So this has been great.

Most of the recipes I'll be posting in the future will be my solutions to using the items that we receive through Angel Food, so if you're ordering from AFM, then this will hopefully be very useful to you.

If you're not, then I'm certain that most recipes will be something you can adapt. (And maybe you could consider ordering from AFM as well!)

Do enjoy!

Wednesday, April 22, 2009

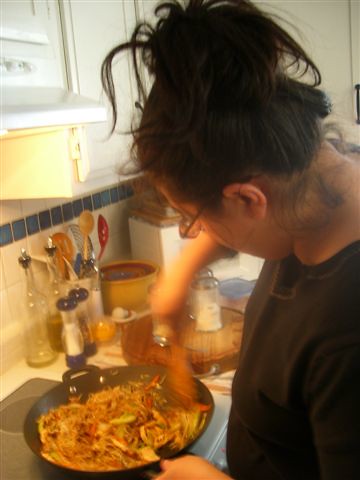
Cheap Iced Coffee (in a pinch)

Whenever I go to Panera Bread, I end up getting a coffee--just a regular coffee from the self-serve urn. It runs about $1.90, but the refills are unlimited. They also have iced coffees but those are upwards of $3.00 each, and no refills.

Today I wanted something cold to follow up my coffee, but I wanted caffeine. I'm trying to avoid soda's sugar water, but I didn't want to buy anything else. So I decided to make myself an iced coffee.

I filled my coffee cup with ice, put in a couple Splenda packets, poured over some half and half, and filled it to the top with hot coffee. After stirring for just a minute, it was nice and cold. Mmmm... A hot coffee AND an iced coffee for around two bucks.

Sunday, April 12, 2009

How To Make a Tomato Sandwich


Tomato lovers everywhere, learn how to make a tomato sandwich!

Yes, I realize a video was not totally necessary to convey this recipe, however it gave me an excuse to practice my video-editing skills. And it was fun.

Hope you are both entertained and informed.

--------------------------------------
Music: Kevin MacLeod

Wednesday, April 08, 2009

Honey Orange Chicken

I love trying to figure out how to use ingredients that I already have, especially ones that I am trying to use up. (e.g. frozen veggies on their last leg, that can of beans that's been sitting around forever, a bag of crushed tortilla chips)

We have a giant container of honey that we purchased awhile back and haven't quite finished. It's getting to that stage where we have to microwave the container everytime we want to pour it, so I'm trying to use it up as fast as I can. Thus, adding it to chicken seemed a good idea. The rest of the recipe sort of came together as I looked around the kitchen.


NOTE: Yes, a better picture would have been nice, but we dished it up so fast that night (it was a quick dinner) that I didn't even think to take a picture.

Honey Orange Chicken
2 large boneless chicken breasts
1/4-1/2 C. honey (don't measure, just pour enough to cover the chicken)
2 clementines (small, easy-peel oranges)
1 scallion
Onion
Apples
Salt


In a dutch oven (or deep pan with a lid), place frozen chicken breasts side by side. Pour on the honey and sprinkle in a pinch of salt. Juice clementines into the pan, getting all the pulp you can onto the chicken as well. Cover.

Cook on medium-high heat for 15-20 minutes, then turn. Add thinly sliced onion, apples, and scallions. Cook the other side for 10 minutes.

When the chicken is done, turn off the heat, remove chicken from the pan and slice somewhat thinly across the grain of the meat. Return to pan and toss to coat in the velvety, sweet honey-orange sauce. Serve over rice if desired.

Monday, March 09, 2009

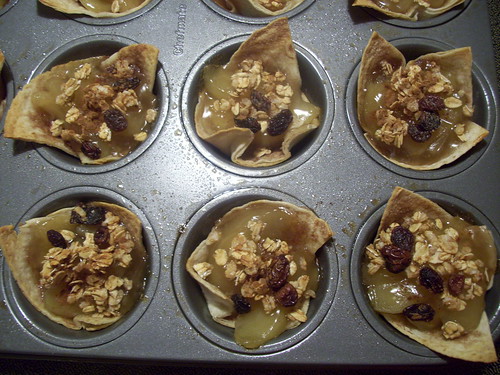
Desperation Apple Pilets

Imagine if you will: It's 11:00 p.m. and you just remembered that you have to bring a snack to share to the ladies Bible study in the morning. You are dead tired. You have nothing that is instant. What do you do? Here's what I did.


Desperation Apple Pilets
1 can apple pie filling
3 flour tortillas

cinnamon & sugar mixture
2-3 Tbsp. melted butter
granola
graham crackers (largish crumbs)
raisins

Cut tortillas into quarters. Brush with melted butter, then sprinkle with cinnamon/sugar mix. Press into a sprayed 12-cup muffin pan so that the corners stick out above the cups.

Add a few pieces of crushed graham crackers into the bottom of the tortilla "cup." Spoon filling in evenly between each serving. Sprinkle with granola and raisins, then sprinkle a little more cinnamon on top.

Bake at 375 for 10 minutes. You can remove these from the pan easily by grabbing two of the now-crunchy tortilla points and lifting out.


These were so easy to make and quick, quick, quick. I tried one, and it was crunchy, sweet, and perfectly sized. I don't anticipate any leftovers tomorrow morning.

Thursday, March 05, 2009

Twice Baked Potatoes

Twice Baked Potatoes aren't all that tough really. If you can bake a potato and make mashers, then you can do this. The recipe below is pretty rough. I never really measure much when I make my mashed potatoes, so I'm simply listing what I normally throw in.


Twice Baked Potatoes

STEP 1: Bake potatoes
Scrub potatoes. Rub vegetable oil on them and sprinkle with salt. Place directly on the rack in a preheated 350 degree oven. Bake for 1 hour.

STEP 2: Split and cool potatoes
Cut each potato in half, lengthwise and allow to cool for 30 minutes or until cool enough to handle. (If you have asbestos fingers like my grandmother did, then perhaps you don't need to wait the whole 30 minutes.)

STEP 3: Scoop potatoes
Using a regular spoon, carve out the insides of the potatoes, leaving only a little bit and the skin. Put the innards into a large bowl or the bowl of your standing mixer. (That's how I make my mashers.)

STEP 4: Make mashed potatoes!
I simply put the potatoes in my stand mixer, then run the paddle mixer on it for a bit to start breaking them down. Then I add garlic salt, pepper, sour cream, butter, and milk. (Butter first so it melts in the hot potatoes.) I like to add chives too if I have them. Run the mixer until mashers are the desired smoothness.

STEP 5: Fill and coat
Spoon the mashers back into the potatoes, allowing for a generous, rounded mound at the top. (Invariably, there will be more mashed potatoes than will fit, so don't be stingy.) Smooth the tops with a spoon, then roll the exposed mashed potatoes in Italian bread crumbs. Sprinkle with shredded cheddar cheese. (You could mix some cheese into the mashers if you wanted.)

STEP 6: Bake!
Place on a cookie sheet and bake in a preheated 375 degree oven for 20-25 minutes.

-------------

Yeah, it takes awhile. You practically have to start them after you get out of bed so you can eat them for dinner, but they are SO worth it.